“We want to make improvements to our processes but we don’t know where to begin. How can we gather information about what is happening with a process that goes through many hands and even many departments?”
#11 Process Flowcharting
What is Process Flowcharting?
Process Flowcharting is a technique for identifying, documenting, and analyzing all the steps in an existing process, and then looking for methods to improve that process. Process in this situation is defined as any series of progressive and interdependent steps to achieve an end result.
People often don’t recognize all the steps involved in a process. Because of this lack of awareness, people can be critical and intolerant of the concerns and perspectives of others. When they understand specifically how a current process works, it is easier to look for opportunities to improve and streamline it. Process Flowcharting can be an eye opener for groups who are unaware of all that must be done to accomplish a specific task, and thus serves as an effective approach to analyze and improve existing processes.
When to Use Process Flowcharting
- When you need to analyze a process or problem that involves many steps and many people
- When people disagree on what is happening, should happen, or why things need to happen
- When you need to save time and money and/or resources by improving efficiency
- When part(s) of a process are causing problems, but you cannot easily identify the best methods for fixing the problem
- When creating a job aid or formalizing a new or existing procedure
- When introducing new technology
How to Use Process Flowcharting
Before the Meeting
1. Determine what process will be analyzed.
2. Determine where in the process to begin your analysis, where to end, and at what level of detail. You might plan to say, for example: “We will examine the billing process from the time an invoice is received in our office until the time that it is paid. We will look at the process in sufficient detail that we can all understand how much time is needed for each specific step.”
3. Determine who needs to be involved. Be sure to include all people who are involved in the process.
NOTE: With very large processes, include representatives of all groups involved.
4. Assemble necessary materials: enough sticky notes, felt tip pens, and chart paper for the meeting.
NOTE: Most processes involve many steps and will require several sheets of chart paper taped together, so instead you might consider using large sheets of brown paper, which are available at most office supply stores.
During the Meeting
1. Explain the purpose of Process Flowcharting. You might introduce the topic by saying, for example, “Process Flowcharting is a technique for identifying all the steps in an existing process and looking for ways to improve that process.”
2. As a group, list the steps involved between the beginning and end of the process.
NOTE: Ask those who actually perform any specific step to give you the information on what that step involves. If your process is very complex, start with high-level steps first, and move to the details in a second round.
Use a sticky note for each step in the process. (This way you can move things around if you have forgotten anything or put it in the wrong order.) Place each sticky note on your chart paper, one after another.
NOTE: If you encounter a portion of the process that no one in the room is familiar with, make a note of it and keep moving forward.
When the process comes to a decision point, split your flowchart in as many directions as options become available at that decision point. Follow each new direction when appropriate, or make a note to see another flow chart for details. A decision point is revealed by a close-ended question, one that can only be answered by yes or no. If yes, one activity happens. If no, another activity happens. You might express this situation as follows: “Is the form completed correctly? If the form has all the information on it, the order is filled. If the form doesn’t have all the necessary information, it is put in a box labeled incomplete.”
3. When the Process Flowchart is finished, review the completed chart for possible gaps or inconsistencies. Plan to show the chart to others familiar with the process to help you identify any missing areas, increase understanding of current processes, and verify the accuracy of the chart.
4. If necessary, assign symbols and redraw the resulting chart. A sample of potential symbols is illustrated below. 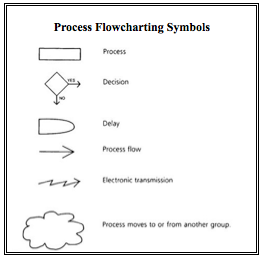
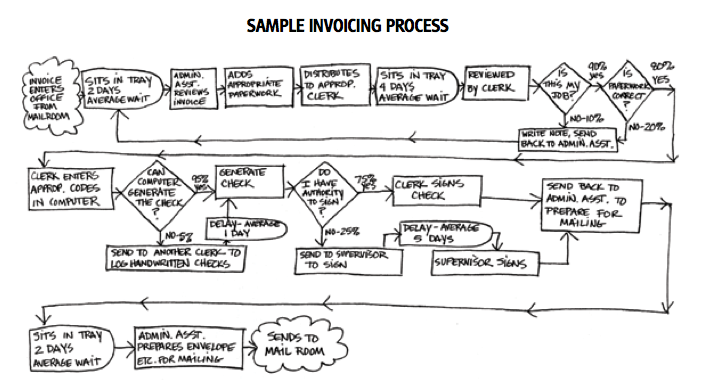
5. With the group, analyze the current process illustrated on your Process Flowchart. Below is an example of what an invoicing Process Flowchart might look like.
Identify problems, unnecessary steps, and methods for measuring improvement.
With help from all involved, look for waste, re-work, and steps that do not add value.
6. Brainstorm and agree on changes to improve the process. Create a new Process Flowchart as a tool for documenting these changes.
NOTE: Consider documenting the expected the anticipated time and cost savings from these changes.
7. Test the new process. Plan how to communicate the changes to others involved in the process and establish a specific follow-up time to measure how well the changes are working.
8. Meet again at a predesignated time to review how well the changes are working. Make any required modifications at that time, and look for additional ways to make the process more effective.
NOTE: Process Flowcharting software exists and is a helpful way of documenting agreed-upon processes.
In Summary:
Process Flowcharting is a technique for identifying, documenting, and analyzing all the steps in an existing process and then looking for opportunities and methods to improve the process.
Before the Meeting
1. Determine the process to be analyzed.
2. Determine where in the process to begin your analysis, where to end, and at what level of detail.
3. Determine who needs to be involved.
4. Assemble enough sticky notes, felt tip pens, and chart paper for the meeting.
During the Meeting
1. Introduce and explain the purpose of Process Flowcharting.
2. As a group, list the steps involved in the process.
3. When your Process Flowchart is finished, review the chart for gaps and inconsistencies.
4. If necessary, assign symbols and redraw the resulting Process Flowchart.
5. As a group, analyze the process revealed by the Process Flowchart, identifying problems, unnecessary steps, and methods for measuring improvement.
6. Brainstorm and agree on changes to improve the process.
7. Test the new process for effectiveness.
8. Meet again at a predesignated time to review how the changes are working. Make modifications to the process as required.
———————-
NOTE: If you would like to receive e-mail notification when I post additional techniques, please sign up through this link. http://eepurl.com/KILan You may unsubscribe at any time.